How to Install and Configure Samba Server in Linux
Samba implements the Server Message Block (SMB) protocol in Red Hat Enterprise Linux. The SMB protocol is used to access resources on a server, such as file shares and shared printers. Additionally, Samba implements the Distributed Computing Environment Remote Procedure Call (DCE RPC) protocol used by Microsoft Windows.
You can run Samba as:
- An Active Directory (AD) or NT4 domain member
- A standalone server
-
An NT4 Primary Domain Controller (PDC) or Backup Domain Controller (BDC)
Red Hat supports the PDC and BDC modes only in existing installations with Windows versions which support NT4 domains. Red Hat recommends not setting up a new Samba NT4 domain, because Microsoft operating systems later than Windows 7 and Windows Server 2008 R2 do not support NT4 domains.
Red Hat does not support running Samba as an AD domain controller (DC).
Independently of the installation mode, you can optionally share directories and printers. This enables Samba to act as a file and print server.
3.1. Understanding the different Samba services and modes
This section describes the different services included in Samba and the different modes you can configure.
3.1.1. The Samba services
Samba provides the following services:
-
smbd -
This service provides file sharing and printing services using the SMB protocol. Additionally, the service is responsible for resource locking and for authenticating connecting users. The
smbsystemdservice starts and stops thesmbddaemon.To use the
smbdservice, install thesambapackage. -
nmbd -
This service provides host name and IP resolution using the NetBIOS over IPv4 protocol. Additionally to the name resolution, the
nmbdservice enables browsing the SMB network to locate domains, work groups, hosts, file shares, and printers. For this, the service either reports this information directly to the broadcasting client or forwards it to a local or master browser. Thenmbsystemdservice starts and stops thenmbddaemon.Note that modern SMB networks use DNS to resolve clients and IP addresses.
To use the
nmbdservice, install thesambapackage. -
winbindd -
This service provides an interface for the Name Service Switch (NSS) to use AD or NT4 domain users and groups on the local system. This enables, for example, domain users to authenticate to services hosted on a Samba server or to other local services. The
winbindsystemdservice starts and stops thewinbindddaemon.If you set up Samba as a domain member,
winbinddmust be started before thesmbdservice. Otherwise, domain users and groups are not available to the local system..To use the
winbinddservice, install thesamba-winbindpackage.Red Hat only supports running Samba as a server with the
winbinddservice to provide domain users and groups to the local system. Due to certain limitations, such as missing Windows access control list (ACL) support and NT LAN Manager (NTLM) fallback, SSSD is not supported.
3.1.2. The Samba security services
The security parameter in the [global] section in the /etc/samba/smb.conf file manages how Samba authenticates users that are connecting to the service. Depending on the mode you install Samba in, the parameter must be set to different values:
- On an AD domain member, set
security = ads -
In this mode, Samba uses Kerberos to authenticate AD users.
For details about setting up Samba as a domain member, see Section 3.5, "Setting up Samba as an AD domain member server".
- On a standalone server, set
security = user -
In this mode, Samba uses a local database to authenticate connecting users.
For details about setting up Samba as a standalone server, see Section 3.3, "Setting up Samba as a standalone server".
- On an NT4 PDC or BDC, set
security = user - In this mode, Samba authenticates users to a local or LDAP database.
- On an NT4 domain member, set
security = domain -
In this mode, Samba authenticates connecting users to an NT4 PDC or BDC. You cannot use this mode on AD domain members.
For details about setting up Samba as a domain member, see Section 3.5, "Setting up Samba as an AD domain member server".
Additional resources
- See the description of the
securityparameter in thesmb.conf(5)man page.
3.1.3. Scenarios when Samba services and Samba client utilities load and reload their configuration
The following describes when Samba services and utilities load and reload their configuration:
-
Samba services reload their configuration:
- Automatically every 3 minutes
- On manual request, for example, when you run the
smbcontrol all reload-configcommand.
- Samba client utilities read their configuration only when you start them.
Note that certain parameters, such as security require a restart of the smb service to take effect and a reload is not sufficient.
Additional resources
- The
How configuration changes are appliedsection in thesmb.conf(5)man page - The
smbd(8),nmbd(8), andwinbindd(8)man pages
3.1.4. Editing the Samba configuration in a safe way
Samba services automatically reload their configuration every 3 minutes. This procedure describes how to edit the Samba configuration in a way that prevents the services reload the changes before you have verified the configuration using the testparm utility.
Prerequisites
- Samba is installed.
Procedure
-
Create a copy of the
/etc/samba/smb.conffile:#
cp /etc/samba/smb.conf /etc/samba/samba.conf. copy - Edit the copied file and make the desired changes.
-
Verify the configuration in the
/etc/samba/samba.conf. copyfile:#
testparm -s /etc/samba/samba.conf. copyIf
testparmreports errors, fix them and run the command again. -
Override the
/etc/samba/smb.conffile with the new configuration:#
mv /etc/samba/samba.conf. copy /etc/samba/smb.conf -
Wait until the Samba services automatically reload their configuration or manually reload the configuration:
#
smbcontrol all reload-config
3.2. Verifying the Samba configuration
Red Hat recommends that you verify the Samba configuration each time you update the /etc/samba/smb.conf file. This section provides details about that.
3.2.1. Verifying the smb.conf file by using the testparm utility
The testparm utility verifies that the Samba configuration in the /etc/samba/smb.conf file is correct. The utility detects invalid parameters and values, but also incorrect settings, such as for ID mapping. If testparm reports no problem, the Samba services will successfully load the /etc/samba/smb.conf file. Note that testparm cannot verify that the configured services will be available or work as expected.
Red Hat recommends that you verify the /etc/samba/smb.conf file by using testparm after each modification of this file.
Prerequisites
- You installed Samba.
- The
/etc/samba/smb.conffile exits.
Procedure
-
Run the
testparmutility as therootuser:#
testparmLoad smb config files from /etc/samba/smb.conf rlimit_max: increasing rlimit_max (1024) to minimum Windows limit (16384) Unknown parameter encountered: "log levell" Processing section "[example_share]" Loaded services file OK. ERROR: The idmap range for the domain * (tdb) overlaps with the range of DOMAIN (ad)! Server role: ROLE_DOMAIN_MEMBER Press enter to see a dump of your service definitions # Global parameters [global] ... [example_share] ...The previous example output reports a non-existent parameter and an incorrect ID mapping configuration.
- If
testparmreports incorrect parameters, values, or other errors in the configuration, fix the problem and run the utility again.
3.3. Setting up Samba as a standalone server
You can set up Samba as a server that is not a member of a domain. In this installation mode, Samba authenticates users to a local database instead of to a central DC. Additionally, you can enable guest access to allow users to connect to one or multiple services without authentication.
3.3.1. Setting up the server configuration for the standalone server
This section describes how to set up the server configuration for a Samba standalone server.
Procedure
-
Install the
sambapackage:#
yum install samba -
Edit the
/etc/samba/smb.conffile and set the following parameters:[global] workgroup = Example-WG netbios name = Server security = user log file = /var/log/samba/%m.log log level = 1
This configuration defines a standalone server named
Serverwithin theExample-WGwork group. Additionally, this configuration enables logging on a minimal level (1) and log files will be stored in the/var/log/samba/directory. Samba will expand the%mmacro in thelog fileparameter to the NetBIOS name of connecting clients. This enables individual log files for each client. -
Optionally, configure file or printer sharing. See:
- Section 3.7, "Setting up a Samba file share that uses POSIX ACLs"
- Section 3.9, "Setting up a share that uses Windows ACLs"
- Section 3.15, "Setting up Samba as a print server"
-
Verify the
/etc/samba/smb.conffile:#
testparm -
If you set up shares that require authentication, create the user accounts.
For details, see Section 3.3.2, "Creating and enabling local user accounts".
-
Open the required ports and reload the firewall configuration by using the
firewall-cmdutility:#
firewall-cmd --permanent --add-port={139/tcp,445/tcp}#firewall-cmd --reload -
Enable and start the
smbservice:#
systemctl enable --now smb
Additional resources
- For further details about the parameters used in the procedure, see the descriptions of the parameters in the
smb.conf(5)man page.
3.3.2. Creating and enabling local user accounts
To enable users to authenticate when they connect to a share, you must create the accounts on the Samba host both in the operating system and in the Samba database. Samba requires the operating system account to validate the Access Control Lists (ACL) on file system objects and the Samba account to authenticate connecting users.
If you use the passdb backend = tdbsam default setting, Samba stores user accounts in the /var/lib/samba/private/passdb.tdb database.
The procedure in this section describes how to create a local Samba user named example.
Prerequisites
- Samba is installed configured as a standalone server.
Procedure
-
Create the operating system account:
#
useradd -M -s /sbin/nologin exampleThis command adds the
exampleaccount without creating a home directory. If the account is only used to authenticate to Samba, assign the/sbin/nologincommand as shell to prevent the account from logging in locally. -
Set a password to the operating system account to enable it:
#
passwd exampleEnter new UNIX password:passwordRetype new UNIX password:passwordpasswd: password updated successfullySamba does not use the password set on the operating system account to authenticate. However, you need to set a password to enable the account. If an account is disabled, Samba denies access if this user connects.
-
Add the user to the Samba database and set a password to the account:
#
smbpasswd -a exampleNew SMB password:passwordRetype new SMB password:passwordAdded user example.Use this password to authenticate when using this account to connect to a Samba share.
-
Enable the Samba account:
#
smbpasswd -e exampleEnabled user example.
3.4. Understanding and configuring Samba ID mapping
Windows domains distinguish users and groups by unique Security Identifiers (SID). However, Linux requires unique UIDs and GIDs for each user and group. If you run Samba as a domain member, the winbindd service is responsible for providing information about domain users and groups to the operating system.
To enable the winbindd service to provide unique IDs for users and groups to Linux, you must configure ID mapping in the /etc/samba/smb.conf file for:
- The local database (default domain)
- The AD or NT4 domain the Samba server is a member of
- Each trusted domain from which users must be able to access resources on this Samba server
Samba provides different ID mapping back ends for specific configurations. The most frequently used back ends are:
| Back end | Use case |
|---|---|
| | The |
| | AD domains only |
| | AD and NT4 domains |
| | AD, NT4, and the |
3.4.1. Planning Samba ID ranges
Regardless of whether you store the Linux UIDs and GIDs in AD or if you configure Samba to generate them, each domain configuration requires a unique ID range that must not overlap with any of the other domains.
If you set overlapping ID ranges, Samba fails to work correctly.
Example 3.1. Unique ID Ranges
The following shows non-overlapping ID mapping ranges for the default (*), AD-DOM, and the TRUST-DOM domains.
[global] ... idmap config * : backend = tdb idmap config * : range = 10000-999999 idmap config AD-DOM:backend = rid idmap config AD-DOM:range = 2000000-2999999 idmap config TRUST-DOM:backend = rid idmap config TRUST-DOM:range = 4000000-4999999
You can only assign one range per domain. Therefore, leave enough space between the domains ranges. This enables you to extend the range later if your domain grows.
If you later assign a different range to a domain, the ownership of files and directories previously created by these users and groups will be lost.
3.4.2. The * default domain
In a domain environment, you add one ID mapping configuration for each of the following:
- The domain the Samba server is a member of
- Each trusted domain that should be able to access the Samba server
However, for all other objects, Samba assigns IDs from the default domain. This includes:
- Local Samba users and groups
- Samba built-in accounts and groups, such as
BUILTIN\Administrators
You must configure the default domain as described in this section to enable Samba to operate correctly.
The default domain back end must be writable to permanently store the assigned IDs.
For the default domain, you can use one of the following back ends:
-
tdb -
When you configure the default domain to use the
tdbback end, set an ID range that is big enough to include objects that will be created in the future and that are not part of a defined domain ID mapping configuration.For example, set the following in the
[global]section in the/etc/samba/smb.conffile:idmap config * : backend = tdb idmap config * : range = 10000-999999
For further details, see Section 3.4.3, "Using the tdb ID mapping back end".
-
autorid -
When you configure the default domain to use the
autoridback end, adding additional ID mapping configurations for domains is optional.For example, set the following in the
[global]section in the/etc/samba/smb.conffile:idmap config * : backend = autorid idmap config * : range = 10000-999999
For further details, see Section 3.4.6, "Using the autorid ID mapping back end".
3.4.3. Using the tdb ID mapping back end
The winbindd service uses the writable tdb ID mapping back end by default to store Security Identifier (SID), UID, and GID mapping tables. This includes local users, groups, and built-in principals.
Use this back end only for the * default domain. For example:
idmap config * : backend = tdb idmap config * : range = 10000-999999
3.4.4. Using the ad ID mapping back end
This section describes how to configure a Samba AD member to use the ad ID mapping back end.
The ad ID mapping back end implements a read-only API to read account and group information from AD. This provides the following benefits:
- All user and group settings are stored centrally in AD.
- User and group IDs are consistent on all Samba servers that use this back end.
- The IDs are not stored in a local database which can corrupt, and therefore file ownerships cannot be lost.
The ad ID mapping back end does not support Active Directory domains with one-way trusts. If you configure a domain member in an Active Directory with one-way trusts, use instead one of the following ID mapping back ends: tdb, rid, or autorid.
The ad back end reads the following attributes from AD:
Prerequisites
- Both users and groups must have unique IDs set in AD, and the IDs must be within the range configured in the
/etc/samba/smb.conffile. Objects whose IDs are outside of the range will not be available on the Samba server. - Users and groups must have all required attributes set in AD. If required attributes are missing, the user or group will not be available on the Samba server. The required attributes depend on your configuration. .Prerequisites
- You installed Samba.
- The Samba configuration, except ID mapping, exists in the
/etc/samba/smb.conffile.
Procedure
-
Edit the
[global]section in the/etc/samba/smb.conffile:-
Add an ID mapping configuration for the default domain (
*) if it does not exist. For example:idmap config * : backend = tdb idmap config * : range = 10000-999999 -
Enable the
adID mapping back end for the AD domain:idmap config DOMAIN : backend = ad -
Set the range of IDs that is assigned to users and groups in the AD domain. For example:
idmap config DOMAIN : range = 2000000-2999999
The range must not overlap with any other domain configuration on this server. Additionally, the range must be set big enough to include all IDs assigned in the future. For further details, see Section 3.4.1, "Planning Samba ID ranges".
-
Set that Samba uses the RFC 2307 schema when reading attributes from AD:
idmap config DOMAIN : schema_mode = rfc2307 -
To enable Samba to read the login shell and the path to the users home directory from the corresponding AD attribute, set:
idmap config DOMAIN : unix_nss_info = yesAlternatively, you can set a uniform domain-wide home directory path and login shell that is applied to all users. For example:
template shell = /bin/bash template homedir = /home/%U
-
By default, Samba uses the
primaryGroupIDattribute of a user object as the user's primary group on Linux. Alternatively, you can configure Samba to use the value set in thegidNumberattribute instead:idmap config DOMAIN : unix_primary_group = yes
-
-
Verify the
/etc/samba/smb.conffile:#
testparm -
Reload the Samba configuration:
#
smbcontrol all reload-config
Additional resources
- Section 3.4.2, "The * default domain"
- For further details about the parameters used in the procedure, see the
smb.conf(5)andidmap_ad(8)man pages. - For details about variable substitution, see the
VARIABLE SUBSTITUTIONSsection in thesmb.conf(5)man page.
3.4.5. Using the rid ID mapping back end
This section describes how to configure a Samba domain member to use the rid ID mapping back end.
Samba can use the relative identifier (RID) of a Windows SID to generate an ID on Red Hat Enterprise Linux.
The RID is the last part of a SID. For example, if the SID of a user is S-1-5-21-5421822485-1151247151-421485315-30014, then 30014 is the corresponding RID.
The rid ID mapping back end implements a read-only API to calculate account and group information based on an algorithmic mapping scheme for AD and NT4 domains. When you configure the back end, you must set the lowest and highest RID in the idmap config DOMAIN : range parameter. Samba will not map users or groups with a lower or higher RID than set in this parameter.
As a read-only back end, rid cannot assign new IDs, such as for BUILTIN groups. Therefore, do not use this back end for the * default domain.
Benefits of using the rid back end
- All domain users and groups that have an RID within the configured range are automatically available on the domain member.
- You do not need to manually assign IDs, home directories, and login shells.
Drawbacks of using the rid back end
- All domain users get the same login shell and home directory assigned. However, you can use variables.
- User and group IDs are only the same across Samba domain members if all use the
ridback end with the same ID range settings. - You cannot exclude individual users or groups from being available on the domain member. Only users and groups outside of the configured range are excluded.
- Based on the formulas the
winbinddservice uses to calculate the IDs, duplicate IDs can occur in multi-domain environments if objects in different domains have the same RID.
Prerequisites
- You installed Samba.
- The Samba configuration, except ID mapping, exists in the
/etc/samba/smb.conffile.
Procedure
-
Edit the
[global]section in the/etc/samba/smb.conffile:-
Add an ID mapping configuration for the default domain (
*) if it does not exist. For example:idmap config * : backend = tdb idmap config * : range = 10000-999999 -
Enable the
ridID mapping back end for the domain:idmap config DOMAIN : backend = rid -
Set a range that is big enough to include all RIDs that will be assigned in the future. For example:
idmap config DOMAIN : range = 2000000-2999999
Samba ignores users and groups whose RIDs in this domain are not within the range.
-
Set a shell and home directory path that will be assigned to all mapped users. For example:
template shell = /bin/bash template homedir = /home/%U
-
-
Verify the
/etc/samba/smb.conffile:#
testparm -
Reload the Samba configuration:
#
smbcontrol all reload-configAdditional resources
- Section 3.4.2, "The * default domain"
- For details about variable substitution, see the
VARIABLE SUBSTITUTIONSsection in thesmb.conf(5)man page. - For details, how Samba calculates the local ID from a RID, see the
idmap_rid(8)man page.
3.4.6. Using the autorid ID mapping back end
This section describes how to configure a Samba domain member to use the autorid ID mapping back end.
The autorid back end works similar to the rid ID mapping back end, but can automatically assign IDs for different domains. This enables you to use the autorid back end in the following situations:
- Only for the
*default domain - For the
*default domain and additional domains, without the need to create ID mapping configurations for each of the additional domains - Only for specific domains
If you use autorid for the default domain, adding additional ID mapping configuration for domains is optional.
Parts of this section were adopted from the idmap config autorid documentation published in the Samba Wiki. License: CC BY 4.0. Authors and contributors: See the history tab on the Wiki page.
Benefits of using the autorid back end
- All domain users and groups whose calculated UID and GID is within the configured range are automatically available on the domain member.
- You do not need to manually assign IDs, home directories, and login shells.
- No duplicate IDs, even if multiple objects in a multi-domain environment have the same RID.
Drawbacks
- User and group IDs are not the same across Samba domain members.
- All domain users get the same login shell and home directory assigned. However, you can use variables.
- You cannot exclude individual users or groups from being available on the domain member. Only users and groups whose calculated UID or GID is outside of the configured range are excluded.
Prerequisites
- You installed Samba.
- The Samba configuration, except ID mapping, exists in the
/etc/samba/smb.conffile.
Procedure
-
Edit the
[global]section in the/etc/samba/smb.conffile:-
Enable the
autoridID mapping back end for the*default domain:idmap config * : backend = autorid
-
Set a range that is big enough to assign IDs for all existing and future objects. For example:
idmap config * : range = 10000-999999Samba ignores users and groups whose calculated IDs in this domain are not within the range.
After you set the range and Samba starts using it, you can only increase the upper limit of the range. Any other change to the range can result in new ID assignments, and thus in losing file ownerships.
-
Optionally, set a range size. For example:
idmap config * : rangesize = 200000Samba assigns this number of continuous IDs for each domain's object until all IDs from the range set in the
idmap config * : rangeparameter are taken. -
Set a shell and home directory path that will be assigned to all mapped users. For example:
template shell = /bin/bash template homedir = /home/%U
-
Optionally, add additional ID mapping configuration for domains. If no configuration for an individual domain is available, Samba calculates the ID using the
autoridback end settings in the previously configured*default domain.
-
-
Verify the
/etc/samba/smb.conffile:#
testparm -
Reload the Samba configuration:
#
smbcontrol all reload-config
Additional resources
- For details about how the back end calculated IDs, see the
THE MAPPING FORMULASsection in theidmap_autorid(8)man page. - For details about using the
idmap configrangesizeparameter, see therangesizeparameter description in theidmap_autorid(8)man page. - For details about variable substitution, see the
VARIABLE SUBSTITUTIONSsection in thesmb.conf(5)man page.
3.5. Setting up Samba as an AD domain member server
If you are running an AD or NT4 domain, use Samba to add your Red Hat Enterprise Linux server as a member to the domain to gain the following:
- Access domain resources on other domain members
- Authenticate domain users to local services, such as
sshd - Share directories and printers hosted on the server to act as a file and print server
3.5.1. Joining a RHEL system to an AD domain
This section describes how to join a Red Hat Enterprise Linux system to an AD domain by using realmd to configure Samba Winbind.
Procedure
-
If your AD requires the deprecated RC4 encryption type for Kerberos authentication, enable support for these ciphers in RHEL:
#
update-crypto-policies --set DEFAULT:AD-SUPPORT -
Install the following packages:
#
yum install realmd oddjob-mkhomedir oddjob samba-winbind-clients \ samba-winbind samba-common-tools samba-winbind-krb5-locator -
To share directories or printers on the domain member, install the
sambapackage:#
yum install samba -
Backup the existing
/etc/samba/smb.confSamba configuration file:#
mv /etc/samba/smb.conf /etc/samba/smb.conf.bak -
Join the domain. For example, to join a domain named
ad.example.com:#
realm join --membership-software=samba --client-software=winbind ad.example.comUsing the previous command, the
realmutility automatically:- Creates a
/etc/samba/smb.conffile for a membership in thead.example.comdomain - Adds the
winbindmodule for user and group lookups to the/etc/nsswitch.conffile - Updates the Pluggable Authentication Module (PAM) configuration files in the
/etc/pam.d/directory - Starts the
winbindservice and enables the service to start when the system boots
- Creates a
- Optionally, set an alternative ID mapping back end or customized ID mapping settings in the
/etc/samba/smb.conffile. For details, see Section 3.4, "Understanding and configuring Samba ID mapping". -
Verify that the
winbindservice is running:#
systemctl status winbind... Active: active (running) since Tue 2018-11-06 19:10:40 CET; 15s agoTo enable Samba to query domain user and group information, the
winbindservice must be running before you startsmb. -
If you installed the
sambapackage to share directories and printers, enable and start thesmbservice:#
systemctl enable --now smb - Optionally, if you are authenticating local logins to Active Directory, enable the
winbind_krb5_localauthplug-in. See Section 3.5.2, "Using the local authorization plug-in for MIT Kerberos".
Verification steps
-
Display an AD user's details, such as the AD administrator account in the AD domain:
#
getent passwd "AD\administrator"AD\administrator:*:10000:10000::/home/administrator@AD:/bin/bash -
Query the members of the domain users group in the AD domain:
#
getent group "AD\Domain Users"AD\domain users:x:10000:user1,user2 -
Optionally, verify that you can use domain users and groups when you set permissions on files and directories. For example, to set the owner of the
/srv/samba/example.txtfile toAD\administratorand the group toAD\Domain Users:#
chown "AD\administrator":"AD\Domain Users" /srv/samba/example.txt -
Verify that Kerberos authentication works as expected:
-
On the AD domain member, obtain a ticket for the
administrator@AD.EXAMPLE.COMprincipal:#
kinit administrator@AD.EXAMPLE.COM -
Display the cached Kerberos ticket:
#
klistTicket cache: KCM:0 Default principal: administrator@AD.EXAMPLE.COM Valid starting Expires Service principal 01.11.2018 10:00:00 01.11.2018 20:00:00 krbtgt/AD.EXAMPLE.COM@AD.EXAMPLE.COM renew until 08.11.2018 05:00:00
-
-
Display the available domains:
#
wbinfo --all-domainsBUILTIN SAMBA-SERVER AD
3.6. Setting up Samba on an IdM domain member
This section describes how to set up Samba on a host that is joined to a Red Hat Identity Management (IdM) domain. Users from IdM and also, if available, from trusted Active Directory (AD) domains, can access shares and printer services provided by Samba.
Using Samba on an IdM domain member is an unsupported Technology Preview feature and contains certain limitations. For example, due to IdM trust controllers not supporting the Global Catalog service, AD-enrolled Windows hosts cannot find IdM users and groups in Windows. Additionally, IdM Trust Controllers do not support resolving IdM groups using the Distributed Computing Environment / Remote Procedure Calls (DCE/RPC) protocols. As a consequence, AD users can only access the Samba shares and printers from IdM clients.
Customers deploying Samba on IdM domain members are encouraged to provide feedback to Red Hat.
Prerequisites
- The host is joined as a client to the IdM domain.
- Both the IdM servers and the client must run on RHEL 8.1 or later.
3.6.1. Preparing the IdM domain for installing Samba on domain members
Before you can set up Samba on an IdM client, you must prepare the IdM domain using the ipa-adtrust-install utility on an IdM server.
Any system where you run the ipa-adtrust-install command automatically becomes an AD trust controller. However, you must run ipa-adtrust-install only once on an IdM server.
Prerequisites
- IdM server is installed.
- You need root privileges to install packages and restart IdM services.
Procedure
-
Install the required packages:
[root@ipaserver ~]#
yum install ipa-server-trust-ad samba-client -
Authenticate as the IdM administrative user:
[root@ipaserver ~]#
kinit admin -
Run the
ipa-adtrust-installutility:[root@ipaserver ~]#
ipa-adtrust-installThe DNS service records are created automatically if IdM was installed with an integrated DNS server.
If you installed IdM without an integrated DNS server,
ipa-adtrust-installprints a list of service records that you must manually add to DNS before you can continue. -
The script prompts you that the
/etc/samba/smb.confalready exists and will be rewritten:WARNING: The smb.conf already exists. Running ipa-adtrust-install will break your existing Samba configuration. Do you wish to continue? [no]:
yes -
The script prompts you to configure the
slapi-nisplug-in, a compatibility plug-in that allows older Linux clients to work with trusted users:Do you want to enable support for trusted domains in Schema Compatibility plugin? This will allow clients older than SSSD 1.9 and non-Linux clients to work with trusted users. Enable trusted domains support in slapi-nis? [no]:
yes -
When prompted, enter the NetBIOS name for the IdM domain or press Enter to accept the name suggested:
Trust is configured but no NetBIOS domain name found, setting it now. Enter the NetBIOS name for the IPA domain. Only up to 15 uppercase ASCII letters, digits and dashes are allowed. Example: EXAMPLE. NetBIOS domain name [IDM]:
-
You are prompted to run the SID generation task to create a SID for any existing users:
Do you want to run the ipa-sidgen task? [no]:
yesThis is a resource-intensive task, so if you have a high number of users, you can run this at another time.
-
(Optional) By default, the Dynamic RPC port range is defined as
49152-65535for Windows Server 2008 and later. If you need to define a different Dynamic RPC port range for your environment, configure Samba to use different ports and open those ports in your firewall settings. The following example sets the port range to55000-65000.[root@ipaserver ~]#
net conf setparm global 'rpc server dynamic port range' 55000-65000[root@ipaserver ~]#firewall-cmd --add-port=55000-65000/tcp[root@ipaserver ~]#firewall-cmd --runtime-to-permanent -
Restart the
ipaservice:[root@ipaserver ~]#
ipactl restart -
Use the
smbclientutility to verify that Samba responds to Kerberos authentication from the IdM side:[root@ipaserver ~]#
smbclient -L server.idm.example.com -klp_load_ex: changing to config backend registry Sharename Type Comment --------- ---- ------- IPC$ IPC IPC Service (Samba 4.12.3) ...
3.6.2. Enabling the AES encryption type in Active Directory using a GPO
This section describes how to enable the AES encryption type in Active Directory (AD) using a group policy object (GPO). Certain features on RHEL, such as running a Samba server on an IdM client, require this encryption type.
Note that RHEL no longer supports the weak DES and RC4 encryption types.
Prerequisites
- You are logged into AD as a user who can edit group policies.
- The
Group Policy Management Consoleis installed on the computer.
Procedure
- Open the
Group Policy Management Console. - Right-click
Default Domain Policy, and selectEdit. TheGroup Policy Management Editoropens. - Navigate to
Computer Configuration→Policies→Windows Settings→Security Settings→Local Policies→Security Options. - Double-click the
Network security: Configure encryption types allowed for Kerberospolicy. - Select
AES256_HMAC_SHA1and, optionally,Future encryption types. - Click OK.
- Close the
Group Policy Management Editor. - Repeat the steps for the
Default Domain Controller Policy. -
Wait until the Windows domain controllers (DC) applied the group policy automatically. Alternatively, to apply the GPO manually on a DC, enter the following command using an account that has administrator permissions:
C:\>
gpupdate /force /target:computer
3.6.3. Installing and configuring a Samba server on an IdM client
This section describes how to install and configure Samba on a client enrolled in an IdM domain.
Procedure
-
Install the
ipa-client-sambapackage:[root@idm_client]#
yum install ipa-client-samba -
Use the
ipa-client-sambautility to prepare the client and create an initial Samba configuration:[root@idm_client]#
ipa-client-sambaSearching for IPA server... IPA server: DNS discovery Chosen IPA master: idm_server.idm.example.com SMB principal to be created: cifs/ idm_client.idm.example.com @ IDM.EXAMPLE.COM NetBIOS name to be used: IDM_CLIENT Discovered domains to use: Domain name: idm.example.com NetBIOS name: IDM SID: S-1-5-21-525930803-952335037-206501584 ID range: 212000000 - 212199999 Domain name: ad.example.com NetBIOS name: AD SID: None ID range: 1918400000 - 1918599999 Continue to configure the system with these values? [no]: yes Samba domain member is configured. Please check configuration at /etc/samba/smb.conf and start smb and winbind services -
By default,
ipa-client-sambaautomatically adds the[homes]section to the/etc/samba/smb.conffile that dynamically shares a user's home directory when the user connects. If users do not have home directories on this server, or if you do not want to share them, remove the following lines from/etc/samba/smb.conf:[homes] read only = no
-
Share directories and printers. For details, see:
- Section 3.7, "Setting up a Samba file share that uses POSIX ACLs"
- Section 3.9, "Setting up a share that uses Windows ACLs"
- Section 3.15, "Setting up Samba as a print server"
-
Open the ports required for a Samba client in the local firewall:
[root@idm_client]#
firewall-cmd --permanent --add-service=samba-client[root@idm_client]#firewall-cmd --reload -
Enable and start the
smbandwinbindservices:[root@idm_client]#
systemctl enable --now smb winbind
Verification steps
Run the following verification steps on a different IdM domain member that has the samba-client package installed:
-
Authenticate and obtain a Kerberos ticket-granting ticket:
$
kinit example_user -
List the shares on the Samba server using Kerberos authentication:
$
smbclient -L idm_client.idm.example.com -klp_load_ex: changing to config backend registry Sharename Type Comment --------- ---- ------- example Disk IPC$ IPC IPC Service (Samba 4.12.3) ...
Additional resources
- For details about which steps
ipa-client-sambaperforms during the configuration, see theipa-client-samba(1)man page.
3.6.4. Manually adding an ID mapping configuration if IdM trusts a new domain
Samba requires an ID mapping configuration for each domain from which users access resources. On an existing Samba server running on an IdM client, you must manually add an ID mapping configuration after the administrator added a new trust to an Active Directory (AD) domain.
Prerequisites
- You configured Samba on an IdM client. Afterward, a new trust was added to IdM.
- The DES and RC4 encryption types for Kerberos must be disabled in the trusted AD domain. For security reasons, RHEL 8 does not support these weak encryption types.
Procedure
-
Authenticate using the host's keytab:
[root@idm_client]#
kinit -k -
Use the
ipa idrange-findcommand to display both the base ID and the ID range size of the new domain. For example, the following command displays the values for thead.example.comdomain:[root@idm_client]#
ipa idrange-find --name=" AD.EXAMPLE.COM _id_range" --raw--------------- 1 range matched --------------- cn: AD.EXAMPLE.COM _id_range ipabaseid: 1918400000 ipaidrangesize: 200000 ipabaserid: 0 ipanttrusteddomainsid: S-1-5-21-968346183-862388825-1738313271 iparangetype: ipa-ad-trust ---------------------------- Number of entries returned 1 ----------------------------You need the values from the
ipabaseidandipaidrangesizeattributes in the next steps. -
To calculate the highest usable ID, use the following formula:
maximum_range = ipabaseid + ipaidrangesize - 1
With the values from the previous step, the highest usable ID for the
ad.example.comdomain is1918599999(1918400000 + 200000 - 1). -
Edit the
/etc/samba/smb.conffile, and add the ID mapping configuration for the domain to the[global]section:idmap config AD : range = 1918400000 - 1918599999 idmap config AD : backend = sss
Specify the value from
ipabaseidattribute as the lowest and the computed value from the previous step as the highest value of the range. -
Restart the
smbandwinbindservices:[root@idm_client]#
systemctl restart smb winbind
Verification steps
-
Authenticate as a user from the new domain and obtain a Kerberos ticket-granting ticket:
$
kinit example_user -
List the shares on the Samba server using Kerberos authentication:
$
smbclient -L idm_client.idm.example.com -klp_load_ex: changing to config backend registry Sharename Type Comment --------- ---- ------- example Disk IPC$ IPC IPC Service (Samba 4.12.3) ...
3.6.5. Additional resources
- For details about joining a RHEL host to an IdM domain, see the
Installing an Identity Management clientsection in theInstalling Identity Managementguide.
3.13. Configuring Samba for macOS clients
The fruit virtual file system (VFS) Samba module provides enhanced compatibility with Apple server message block (SMB) clients.
3.15. Setting up Samba as a print server
If you set up Samba as a print server, clients in your network can use Samba to print. Additionally, Windows clients can, if configured, download the driver from the Samba server.
Parts of this section were adopted from the Setting up Samba as a Print Server documentation published in the Samba Wiki. License: CC BY 4.0. Authors and contributors: See the history tab on the Wiki page.
Prerequisites
Samba has been set up in one of the following modes:
- Standalone server
- Domain member
3.15.1. The Samba spoolssd service
The Samba spoolssd is a service that is integrated into the smbd service. Enable spoolssd in the Samba configuration to significantly increase the performance on print servers with a high number of jobs or printers.
Without spoolssd, Samba forks the smbd process and initializes the printcap cache for each print job. In case of a large number of printers, the smbd service can become unresponsive for multiple seconds while the cache is initialized. The spoolssd service enables you to start pre-forked smbd processes that are processing print jobs without any delays. The main spoolssd smbd process uses a low amount of memory, and forks and terminates child processes.
The following procedure explains how to enable the spoolssd service.
Procedure
-
Edit the
[global]section in the/etc/samba/smb.conffile:-
Add the following parameters:
rpc_server:spoolss = external rpc_daemon:spoolssd = fork
-
Optionally, you can set the following parameters:
Parameter Default Description spoolssd:prefork_min_children5
Minimum number of child processes
spoolssd:prefork_max_children25
Maximum number of child processes
spoolssd:prefork_spawn_rate5
Samba forks the number of new child processes set in this parameter, up to the value set in
spoolssd:prefork_max_children, if a new connection is establishedspoolssd:prefork_max_allowed_clients100
Number of clients, a child process serves
spoolssd:prefork_child_min_life60
Minimum lifetime of a child process in seconds. 60 seconds is the minimum.
-
-
Verify the
/etc/samba/smb.conffile:#
testparm -
Restart the
smbservice:#
systemctl restart smbAfter you restarted the service, Samba automatically starts
smbdchild processes:#
ps axf... 30903 smbd 30912 \_ smbd 30913 \_ smbd 30914 \_ smbd 30915 \_ smbd ...
3.15.2. Enabling print server support in Samba
This section explains how to enable the print server support in Samba.
Procedure
-
On the Samba server, set up CUPS and add the printer to the CUPS back end. For details about configuring printers in CUPS; see the documentation provided in the CUPS web console (https:// print_server_host_name :631/help) on the print server.
Samba can only forward the print jobs to CUPS if CUPS is installed locally on the Samba print server.
-
Edit the
/etc/samba/smb.conffile:-
If you want to enable the
spoolssdservice, add the following parameters to the[global]section:rpc_server:spoolss = external rpc_daemon:spoolssd = fork
-
To configure the printing back end, add the
[printers]section:[printers] comment = All Printers path = /var/tmp/ printable = yes create mask = 0600
The
[printers]share name is hard-coded and cannot be changed.
-
-
Verify the
/etc/samba/smb.conffile:#
testparm -
Open the required ports and reload the firewall configuration using the
firewall-cmdutility:#
firewall-cmd --permanent --add-service=samba#firewall-cmd --reload -
Restart the
smbservice:#
systemctl restart smb
After restarting the service, Samba automatically shares all printers that are configured in the CUPS back end. If you want to manually share only specific printers, see Section 3.15.3, "Manually sharing specific printers".
3.15.3. Manually sharing specific printers
If you configured Samba as a print server, by default, Samba shares all printers that are configured in the CUPS back end. The following procedure explains how to share only specific printers.
Prerequisites
- Samba is set up as a print server
Procedure
-
Edit the
/etc/samba/smb.conffile:-
In the
[global]section, disable automatic printer sharing by setting:load printers = no
-
Add a section for each printer you want to share. For example, to share the printer named
examplein the CUPS back end asExample-Printerin Samba, add the following section:[Example-Printer] path = /var/tmp/ printable = yes printer name = example
You do not need individual spool directories for each printer. You can set the same spool directory in the
pathparameter for the printer as you set in the[printers]section.
-
-
Verify the
/etc/samba/smb.conffile:#
testparm -
Reload the Samba configuration:
#
smbcontrol all reload-config
3.16. Setting up automatic printer driver downloads for Windows clients on Samba print servers
If you are running a Samba print server for Windows clients, you can upload drivers and preconfigure printers. If a user connects to a printer, Windows automatically downloads and installs the driver locally on the client. The user does not require local administrator permissions for the installation. Additionally, Windows applies preconfigured driver settings, such as the number of trays.
Parts of this section were adopted from the Setting up Automatic Printer Driver Downloads for Windows Clients documentation published in the Samba Wiki. License: CC BY 4.0. Authors and contributors: See the history tab on the Wiki page.
Prerequisites
- Samba is set up as a print server
3.16.1. Basic information about printer drivers
This section provides general information about printer drivers.
Supported driver model version
Samba only supports the printer driver model version 3 which is supported in Windows 2000 and later, and Windows Server 2000 and later. Samba does not support the driver model version 4, introduced in Windows 8 and Windows Server 2012. However, these and later Windows versions also support version 3 drivers.
Package-aware drivers
Samba does not support package-aware drivers.
Preparing a printer driver for being uploaded
Before you can upload a driver to a Samba print server:
- Unpack the driver if it is provided in a compressed format.
-
Some drivers require to start a setup application that installs the driver locally on a Windows host. In certain situations, the installer extracts the individual files into the operating system's temporary folder during the setup runs. To use the driver files for uploading:
- Start the installer.
- Copy the files from the temporary folder to a new location.
- Cancel the installation.
Ask your printer manufacturer for drivers that support uploading to a print server.
Providing 32-bit and 64-bit drivers for a printer to a client
To provide the driver for a printer for both 32-bit and 64-bit Windows clients, you must upload a driver with exactly the same name for both architectures. For example, if you are uploading the 32-bit driver named Example PostScript and the 64-bit driver named Example PostScript (v1.0), the names do not match. Consequently, you can only assign one of the drivers to a printer and the driver will not be available for both architectures.
3.16.2. Enabling users to upload and preconfigure drivers
To be able to upload and preconfigure printer drivers, a user or a group needs to have the SePrintOperatorPrivilege privilege granted. A user must be added into the printadmin group. Red Hat Enterprise Linux automatically creates this group when you install the samba package. The printadmin group gets assigned the lowest available dynamic system GID that is lower than 1000.
Procedure
-
For example, to grant the
SePrintOperatorPrivilegeprivilege to theprintadmingroup:#
net rpc rights grant "printadmin" SePrintOperatorPrivilege -U " DOMAIN \administrator"Enter DOMAIN \administrator's password: Successfully granted rights.In a domain environment, grant
SePrintOperatorPrivilegeto a domain group. This enables you to centrally manage the privilege by updating a user's group membership. -
To list all users and groups having
SePrintOperatorPrivilegegranted:#
net rpc rights list privileges SePrintOperatorPrivilege -U " DOMAIN \administrator"Enter administrator's password: SePrintOperatorPrivilege: BUILTIN\Administrators DOMAIN \printadmin
3.16.4. Creating a GPO to enable clients to trust the Samba print server
For security reasons, recent Windows operating systems prevent clients from downloading non-package-aware printer drivers from an untrusted server. If your print server is a member in an AD, you can create a Group Policy Object (GPO) in your domain to trust the Samba server.
Prerequisites
- The Samba print server is a member of an AD domain.
- The Windows computer you are using to create the GPO must have the Windows Remote Server Administration Tools (RSAT) installed. For details, see the Windows documentation.
Procedure
- Log into a Windows computer using an account that is allowed to edit group policies, such as the AD domain
Administratoruser. - Open the
Group Policy Management Console. -
Right-click to your AD domain and select
Create a GPO in this domain, and Link it here.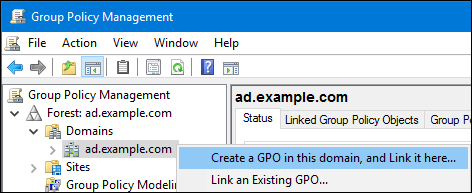
- Enter a name for the GPO, such as
Legacy Printer Driver Policyand clickOK. The new GPO will be displayed under the domain entry. - Right-click to the newly-created GPO and select
Editto open theGroup Policy Management Editor. -
Navigate to → → → .

-
On the right side of the window, double-click
Point and Print Restrictionto edit the policy:-
Enable the policy and set the following options:
- Select
Users can only point and print to these serversand enter the fully-qualified domain name (FQDN) of the Samba print server to the field next to this option. -
In both check boxes under
Security Prompts, selectDo not show warning or elevation prompt.
- Select
- Click OK.
-
-
Double-click
Package Point and Print - Approved serversto edit the policy:- Enable the policy and click the
Showbutton. -
Enter the FQDN of the Samba print server.

- Close both the
Show Contentsand the policy's properties window by clickingOK.
- Enable the policy and click the
- Close the
Group Policy Management Editor. - Close the
Group Policy Management Console.
After the Windows domain members applied the group policy, printer drivers are automatically downloaded from the Samba server when a user connects to a printer.
Additional resources
- For further details about using group policies, see the Windows documentation.
3.16.5. Uploading drivers and preconfiguring printers
Use the Print Management application on a Windows client to upload drivers and preconfigure printers hosted on the Samba print server. For further details, see the Windows documentation.
3.17. Running Samba on a server with FIPS mode enabled
This section provides an overview of the limitations of running Samba with FIPS mode enabled. It also provides the procedure for enabling FIPS mode on a Red Hat Enterprise Linux host running Samba.
3.17.1. Limitations of using Samba in FIPS mode
The following Samba modes and features work in FIPS mode under the indicated conditions:
- Samba as a domain member only in Active Directory (AD) or Red Hat Identity Management (IdM) environments with Kerberos authentication that uses AES ciphers.
- Samba as a file server on an Active Directory domain member. However, this requires that clients use Kerberos to authenticate to the server.
Due to the increased security of FIPS, the following Samba features and modes do not work if FIPS mode is enabled:
- NT LAN Manager (NTLM) authentication because RC4 ciphers are blocked
- The server message block version 1 (SMB1) protocol
- The stand-alone file server mode because it uses NTLM authentication
- NT4-style domain controllers
- NT4-style domain members. Note that Red Hat continues supporting the primary domain controller (PDC) functionality IdM uses in the background.
- Password changes against the Samba server. You can only perform password changes using Kerberos against an Active Directory domain controller.
The following feature is not tested in FIPS mode and, therefore, is not supported by Red Hat:
- Running Samba as a print server
3.17.2. Using Samba in FIPS mode
This section describes how to enable the FIPS mode on a RHEL host that runs Samba.
Prerequisites
- Samba is configured on the Red Hat Enterprise Linux host.
- Samba runs in a mode that is supported in FIPS mode.
Procedure
-
Enable the FIPS mode on RHEL:
#
fips-mode-setup --enable -
Reboot the server:
#
reboot -
Use the
testparmutility to verify the configuration:# testparm -s
If the command displays any errors or incompatibilities, fix them to ensure that Samba works correctly.
3.18. Tuning the performance of a Samba server
This chapter describes what settings can improve the performance of Samba in certain situations, and which settings can have a negative performance impact.
Parts of this section were adopted from the Performance Tuning documentation published in the Samba Wiki. License: CC BY 4.0. Authors and contributors: See the history tab on the Wiki page.
Prerequisites
- Samba is set up as a file or print server
3.18.1. Setting the SMB protocol version
Each new SMB version adds features and improves the performance of the protocol. The recent Windows and Windows Server operating systems always supports the latest protocol version. If Samba also uses the latest protocol version, Windows clients connecting to Samba benefit from the performance improvements. In Samba, the default value of the server max protocol is set to the latest supported stable SMB protocol version.
To always have the latest stable SMB protocol version enabled, do not set the server max protocol parameter. If you set the parameter manually, you will need to modify the setting with each new version of the SMB protocol, to have the latest protocol version enabled.
The following procedure explains how to use the default value in the server max protocol parameter.
Procedure
- Remove the
server max protocolparameter from the[global]section in the/etc/samba/smb.conffile. -
Reload the Samba configuration
#
smbcontrol all reload-config
3.18.3. Settings that can have a negative performance impact
By default, the kernel in Red Hat Enterprise Linux is tuned for high network performance. For example, the kernel uses an auto-tuning mechanism for buffer sizes. Setting the socket options parameter in the /etc/samba/smb.conf file overrides these kernel settings. As a result, setting this parameter decreases the Samba network performance in most cases.
To use the optimized settings from the Kernel, remove the socket options parameter from the [global] section in the /etc/samba/smb.conf.
3.19. Configuring Samba to be compatible with clients that require an SMB version lower than the default
Samba uses a reasonable and secure default value for the minimum server message block (SMB) version it supports. However, if you have clients that require an older SMB version, you can configure Samba to support it.
3.19.1. Setting the minimum SMB protocol version supported by a Samba server
In Samba, the server min protocol parameter in the /etc/samba/smb.conf file defines the minimum server message block (SMB) protocol version the Samba server supports. This section describes how to change the minimum SMB protocol version.
By default, Samba on RHEL 8.2 and later supports only SMB2 and newer protocol versions. Red Hat recommends to not use the deprecated SMB1 protocol. However, if your environment requires SMB1, you can manually set the server min protocol parameter to NT1 to re-enable SMB1.
Prerequisites
- Samba is installed and configured.
Procedure
-
Edit the
/etc/samba/smb.conffile, add theserver min protocolparameter, and set the parameter to the minimum SMB protocol version the server should support. For example, to set the minimum SMB protocol version toSMB3, add:server min protocol = SMB3
-
Restart the
smbservice:#
systemctl restart smb
Additional resources
- For a list of protocol versions you can set in
server min protocolparameter, see the description of theserver max protocolparameter in thesmb.conf(5)man page.
3.20. Frequently used Samba command-line utilities
This chapter describes frequently used commands when working with a Samba server.
3.20.1. Using the net ads join and net rpc join commands
Using the join subcommand of the net utility, you can join Samba to an AD or NT4 domain. To join the domain, you must create the /etc/samba/smb.conf file manually, and optionally update additional configurations, such as PAM.
Red Hat recommends using the realm utility to join a domain. The realm utility automatically updates all involved configuration files.
Procedure
-
Manually create the
/etc/samba/smb.conffile with the following settings:-
For an AD domain member:
[global] workgroup = domain_name security = ads passdb backend = tdbsam realm = AD_REALM
-
For an NT4 domain member:
[global] workgroup = domain_name security = user passdb backend = tdbsam
-
- Add an ID mapping configuration for the
*default domain and for the domain you want to join to the[global] section in the/etc/samba/smb.conffile. -
Verify the
/etc/samba/smb.conffile:#
testparm -
Join the domain as the domain administrator:
-
To join an AD domain:
#
net ads join -U "DOMAIN\administrator" -
To join an NT4 domain:
#
net rpc join -U "DOMAIN\administrator"
-
-
Append the
winbindsource to thepasswdandgroupdatabase entry in the/etc/nsswitch.conffile:passwd: files
winbindgroup: fileswinbind -
Enable and start the
winbindservice:#
systemctl enable --now winbind -
Optionally, configure PAM using the
authselectutility.For details, see the
authselect(8)man page. -
Optionally for AD environments, configure the Kerberos client.
For details, see the documentation of your Kerberos client.
3.20.2. Using the net rpc rights command
In Windows, you can assign privileges to accounts and groups to perform special operations, such as setting ACLs on a share or upload printer drivers. On a Samba server, you can use the net rpc rights command to manage privileges.
Listing privileges you can set
To list all available privileges and their owners, use the net rpc rights list command. For example:
# net rpc rights list -U " DOMAIN \administrator" Enter DOMAIN \administrator's password: SeMachineAccountPrivilege Add machines to domain SeTakeOwnershipPrivilege Take ownership of files or other objects SeBackupPrivilege Back up files and directories SeRestorePrivilege Restore files and directories SeRemoteShutdownPrivilege Force shutdown from a remote system SePrintOperatorPrivilege Manage printers SeAddUsersPrivilege Add users and groups to the domain SeDiskOperatorPrivilege Manage disk shares SeSecurityPrivilege System security Granting privileges
To grant a privilege to an account or group, use the net rpc rights grant command.
For example, grant the SePrintOperatorPrivilege privilege to the DOMAIN \printadmin group:
# net rpc rights grant " DOMAIN \printadmin" SePrintOperatorPrivilege -U " DOMAIN \administrator" Enter DOMAIN \administrator's password: Successfully granted rights. Revoking privileges
To revoke a privilege from an account or group, use the net rpc rights revoke command.
For example, to revoke the SePrintOperatorPrivilege privilege from the DOMAIN \printadmin group:
# net rpc rights remoke " DOMAIN \printadmin" SePrintOperatorPrivilege -U " DOMAIN \administrator" Enter DOMAIN \administrator's password: Successfully revoked rights.
3.20.4. Using the net user command
The net user command enables you to perform the following actions on an AD DC or NT4 PDC:
- List all user accounts
- Add users
- Remove Users
Specifying a connection method, such as ads for AD domains or rpc for NT4 domains, is only required when you list domain user accounts. Other user-related subcommands can auto-detect the connection method.
Pass the -U user_name parameter to the command to specify a user that is allowed to perform the requested action.
Listing domain user accounts
To list all users in an AD domain:
# net ads user -U " DOMAIN \administrator" To list all users in an NT4 domain:
# net rpc user -U " DOMAIN \administrator" Adding a user account to the domain
On a Samba domain member, you can use the net user add command to add a user account to the domain.
For example, add the user account to the domain:
-
Add the account:
#
net user add user password -U " DOMAIN \administrator"User user added -
Optionally, use the remote procedure call (RPC) shell to enable the account on the AD DC or NT4 PDC. For example:
#
net rpc shell -U DOMAIN \administrator -S DC_or_PDC_nameTalking to domain DOMAIN ( S-1-5-21-1424831554-512457234-5642315751 ) net rpc>user edit disabled user : noSet user 's disabled flag from [yes] to [no] net rpc>exit
Deleting a user account from the domain
On a Samba domain member, you can use the net user delete command to remove a user account from the domain.
For example, to remove the user account from the domain:
# net user delete user -U " DOMAIN \administrator" User user deleted
3.20.5. Using the rpcclient utility
The rpcclient utility enables you to manually execute client-side Microsoft Remote Procedure Call (MS-RPC) functions on a local or remote SMB server. However, most of the features are integrated into separate utilities provided by Samba. Use rpcclient only for testing MS-PRC functions.
Prerequisites
- The
samba-clientpackage is installed.
Examples
For example, you can use the rpcclient utility to:
-
Manage the printer Spool Subsystem (SPOOLSS).
Example 3.7. Assigning a Driver to a Printer
#
rpcclient server_name -U " DOMAIN \administrator" -c 'setdriver " printer_name " " driver_name "'Enter DOMAIN \administrators password: Successfully set printer_name to driver driver_name . -
Retrieve information about an SMB server.
Example 3.8. Listing all File Shares and Shared Printers
#
rpcclient server_name -U " DOMAIN \administrator" -c 'netshareenum'Enter DOMAIN \administrators password: netname: Example_Share remark: path: C:\srv\samba\example_share\ password: netname: Example_Printer remark: path: C:\var\spool\samba\ password: -
Perform actions using the Security Account Manager Remote (SAMR) protocol.
Example 3.9. Listing Users on an SMB Server
#
rpcclient server_name -U " DOMAIN \administrator" -c 'enumdomusers'Enter DOMAIN \administrators password: user:[ user1 ] rid:[ 0x3e8 ] user:[ user2 ] rid:[ 0x3e9 ]If you run the command against a standalone server or a domain member, it lists the users in the local database. Running the command against an AD DC or NT4 PDC lists the domain users.
Additional resources
For a complete list of supported subcommands, see the COMMANDS section in the rpcclient(1) man page.
3.20.6. Using the samba-regedit application
Certain settings, such as printer configurations, are stored in the registry on the Samba server. You can use the ncurses-based samba-regedit application to edit the registry of a Samba server.

Prerequisites
- The
samba-clientpackage is installed.
Procedure
To start the application, enter:
# samba-regedit
Use the following keys:
- Cursor up and cursor down: Navigate through the registry tree and the values.
- Enter : Opens a key or edits a value.
- Tab : Switches between the
KeyandValuepane. - Ctrl + C : Closes the application.
3.20.7. Using the smbcontrol utility
The smbcontrol utility enables you to send command messages to the smbd, nmbd, winbindd, or all of these services. These control messages instruct the service, for example, to reload its configuration.
The procedure in this section shows how to to reload the configuration of the smbd, nmbd, winbindd services by sending the reload-config message type to the all destination.
Prerequisites
- The
samba-common-toolspackage is installed.
Procedure
# smbcontrol all reload-config Additional resources
For further details and a list of available command message types, see the smbcontrol(1) man page.
3.20.8. Using the smbpasswd utility
The smbpasswd utility manages user accounts and passwords in the local Samba database.
Prerequisites
- The
samba-common-toolspackage is installed.
Procedure
-
If you run the command as a user,
smbpasswdchanges the Samba password of the user who run the command. For example:[user@server ~]$
smbpasswdNew SMB password: password Retype new SMB password: password -
If you run
smbpasswdas therootuser, you can use the utility, for example, to:-
Create a new user:
[root@server ~]#
smbpasswd -a user_nameNew SMB password:password ` Retype new SMB password: [command]password ` Added user user_name .Before you can add a user to the Samba database, you must create the account in the local operating system. See the Adding a new user from the command line section in the Configuring basic system settings guide.
-
Enable a Samba user:
[root@server ~]#
smbpasswd -e user_nameEnabled user user_name . -
Disable a Samba user:
[root@server ~]#
smbpasswd -x user_nameDisabled user ser_name -
Delete a user:
[root@server ~]#
smbpasswd -x user_nameDeleted user user_name .
-
Additional resources
For further details, see the smbpasswd(8) man page.
3.20.9. Using the smbstatus utility
The smbstatus utility reports on:
- Connections per PID of each
smbddaemon to the Samba server. This report includes the user name, primary group, SMB protocol version, encryption, and signing information. - Connections per Samba share. This report includes the PID of the
smbddaemon, the IP of the connecting machine, the time stamp when the connection was established, encryption, and signing information. - A list of locked files. The report entries include further details, such as opportunistic lock (oplock) types
Prerequisites
- The
sambapackage is installed. - The
smbdservice is running.
Procedure
# smbstatus Samba version 4.12.3 PID Username Group Machine Protocol Version Encryption Signing ....------------------------------------------------------------------------------------------------------------------------- 963 DOMAIN \administrator DOMAIN \domain users client-pc (ipv4:192.0.2.1:57786) SMB3_02 - AES-128-CMAC Service pid Machine Connected at Encryption Signing: ....--------------------------------------------------------------------------- example 969 192.0.2.1 Thu Nov 1 10:00:00 2018 CEST - AES-128-CMAC Locked files: Pid Uid DenyMode Access R/W Oplock SharePath Name Time ....-------------------------------------------------------------------------------------------------------- 969 10000 DENY_WRITE 0x120089 RDONLY LEASE(RWH) /srv/samba/example file.txt Thu Nov 1 10:00:00 2018 Additional resources
For further details, see the smbstatus(1) man page.
3.20.10. Using the smbtar utility
The smbtar utility backs up the content of an SMB share or a subdirectory of it and stores the content in a tar archive. Alternatively, you can write the content to a tape device.
Prerequisites
- The
samba-clientpackage is installed.
Procedure
-
Use the following command to back up the content of the
demodirectory on the//server/example/share and store the content in the/root/example.tararchive:#
smbtar -s server -x example -u user_name -p password -t /root/example.tar
Additional resources
For further details, see the smbtar(1) man page.
3.20.11. Using the wbinfo utility
The wbinfo utility queries and returns information created and used by the winbindd service.
Prerequisites
- The
samba-winbind-clientspackage is installed.
Procedure
You can use wbinfo, for example, to:
-
List domain users:
#
wbinfo -uAD\administrator AD\guest ... -
List domain groups:
#
wbinfo -gAD\domain computers AD\domain admins AD\domain users ... -
Display the SID of a user:
#
wbinfo --name-to-sid="AD\administrator"S-1-5-21-1762709870-351891212-3141221786-500 SID_USER (1) -
Display information about domains and trusts:
#
wbinfo --trusted-domains --verboseDomain Name DNS Domain Trust Type Transitive In Out BUILTIN None Yes Yes Yes server None Yes Yes Yes DOMAIN1 domain1.example.com None Yes Yes Yes DOMAIN2 domain2.example.com External No Yes Yes
Additional resources
For further details, see the wbinfo(1) man page.
How to Install and Configure Samba Server in Linux
Source: https://access.redhat.com/documentation/en-us/red_hat_enterprise_linux/8/html/deploying_different_types_of_servers/assembly_using-samba-as-a-server_deploying-different-types-of-servers